Wednesday, November 26, 2008

Water, It's Heavy. But We Need It!

We know that when hiking we should more water than usual.

So, how much should you drink?

How should you carry it?

I was researching the answers to this for myself and decided that if I’m doing the research I might as well share.

Water is a pain in the ass, and here’s why:

  • Water is heavy at 8.3 lbs per Gallon(3.75 liters)
  • On an average hot day without exercising you should have about 3 liters of water a day
  • If you are hiking you want to bring more, let’s say 3.75 liters This is about a gallon of water. At 8.3 pounds per gallon, This is very manageable if you are going on a day hike, but not if you are going for longer that that. Considering that for 2 days that’s over 16 pounds you have to add before you even start.
  • You need containers to hold these amounts of water which can be cumbersome.

So how you carry the water you need?

  • Carry a water filter with you when backpacking, which allows you to get clean water from a lake, pond, puddle, river or stream. Insert the hose of the water filter into the water and pump the water into a bottle. (http://www.ehow.com/how_2210377_carry-water-hydrate-backpacking.html) I have a small review on one such filter I used on a camping trip the filter is called the Katadyn Hiker Pro Water Micro filter You can read what I thought by reading about my California Camping Trip

  • Hike with a bladder system, such as a camel pack. This can be placed in your backpack and has a hose that attaches to it and connects to your shoulder strap. You can filter water directly into your bladder system. You can pick one of these up for a good price at Wal-Mart. Or you can find Multiple web sites on the Web that sell them as well.

I use the water pack option. I also carry Some water purifier tablets just in case.

If you have any Ideas on carrying water, please leave a post.

Monday, September 22, 2008

hikingforums.net

I recently found a forum for hiking called hikingforums.net. It is a great Forum with plenty of ideas as well as help for anyone new to hiking. I encourage everyone to check it out.

Tuesday, September 9, 2008

Bristle cone Trail-Mt. Charleston, NV

Bristle cone trail at MT. Charleston goes in a loop. and it has some great scenery.
The following information about the trail was taken from the US Forest Service site at

Bristlecone Trail

[Symbol] hiking.[Symbol] Horse
LENGTH: 5.2 miles round trip
ELEVATION: 8,470 feet to 9,380 feet
USE: Hiking, pack & saddle, biking
ABOUT THE HIKE:
  • The beginning of the Upper Bristlecone Trail winds through a picturesque forest abundant with fir and large quaking aspen. As you climb out of the canyon, the vegetation becomes sparser due to harsher conditions and shorter growing season found on these more exposed slopes. It is here that you reach the rugged, stands of ancient Bristlecone pines.
  • After two miles the trail widens and follows the abandoned WPA road. Follow this road for the remainder of the Bristlecone Trail.
  • The route passes the junction with the Bonanza Trail then descends into a canyon as the Lower Bristlecone Trail. Stay on the abandoned road, pass through a small grove of aspen, and continue on until the roadbed ends at the lower Bristlecone trail head.
  • Walk south up State Route 156 for ¾ mile to return to the upper parking lot of Lee Canyon Ski Area.
DIRECTIONS TO TRAILHEAD:
Upper Bristlecone Trail head
  • Travel southwest on State Route 156 for 17 ¼ miles into Lee Canyon until the road dead ends in the upper most parking lot of the Lee Canyon Ski Area. The Upper Bristlecone Trail head is located on the west side of this lot.
Lower Bristlecone Trail head

  • Head southwest on State Route 156 for 16 ½ miles into Lee Canyon . Turn right onto Scout Canyon Road 140 ft. north of the McWilliams Campground to reach the trail head. Ample parking is available at this trail head.
Bristlecone Trail Map
Bristlecone Trail Map Legend


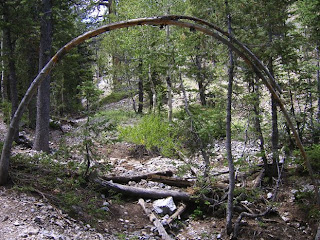
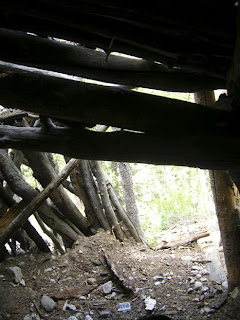
It was a great hike with wonderful scenery.  As a matter of fact a little off the trail at one spot there was a little log shelter that it most likely used by skiers and snowboarder in the winter time.  Considering that the upper trail starts at a ski area.

 
Archway on the trail
 
 
Along the trail
 
Thistle along the trail
 
Log Shelter
Inside Shelter
 
View from High point in the loop
 
Natalie On the trail
 
Another view
Once again it was a great hike.  Although the whole thing was over 5 miles.  So considering the dryness of the air and heat in the summer of this region.  I encourage you to make sure you bring enough water.  Especially since there is none in the summer time near the trail.
More hikes and Photos coming soon.  Thanks for reading.

Wednesday, September 3, 2008


While looking for information for my blister prevention post, I came across a site called Hike Hacker. It has some great tips on hiking for the new comer and the seasoned hiker. As a matter of fact I got one of my blister prevention ideas from them. They have many other good articles as well.

http://www.hikehacker.com/

Tuesday, September 2, 2008

How to Prevent Blisters

Blisters are one thing that any hiker has to deal with at one time or another. Blisters can not only be painful and ruin a hike, they can also lead to infection and be dangerous. The best way to take care of them is to prevent them.

First we have to take a look at what a blister is, and what causes it.

according to http://en.wikipedia.org/wiki/Blisters

A blister is a small pocket of fluid within the upper layers of the skin. Blisters can be filled with blood (known as blood blisters) or with pus (if they become infected). However, most blisters are filled with a clear fluid called serum. Serum is the part of the blood that remains after red blood cells and clotting agents have been removed.

A blister usually forms because the outer layer of the skin has become damaged. Fluid collects under the damaged layer of skin, cushioning the tissue underneath, protecting it from further damage and allowing it to heal.

A blood-blister usually forms when a small blood vessel close to the surface of the skin ruptures (breaks) and blood leaks into a tear between the layers of skin. This can happen if the skin is crushed, pinched or squeezed very tightly.

Blisters can also form as the result of certain medical conditions.


OK, so we know what a blister is, How do we get them.

Back to wiki, it says.

Causes

Blisters are usually caused by injury to the skin from heat or from friction, which creates a tear between the epidermis—the upper layer of the skin—and the layers beneath. When this happens, the surface of the skin remains intact, but is pushed outwards as serum seeps into the newly created space between the layers.

Short periods of intense rubbing can cause a blister, as can any rubbing of the skin continued long enough. Blisters are most common on the hands and feet, as these extremities are susceptible while walking, running, or performing repetitive motions. Blisters form more easily on moist skin than on dry or soaked skin, and are more common in warm conditions.

So in essence it is saying that hiking is probably the easiest way to get a blister. But, looking at the causes it is easy to find ways to prevent them.

  1. It says the main cause of blisters are friction.
  • To minimize this you want to wear hiking boots that fit well. This will minimize any rubbing that your foot will be doing.
  • You want to wear appropriate socks. The best sock I have found are Thorlo® you can purchase a pair at http://www.thorlo.com/hiking-socks.php
2. You are more likely to get a blister if your feet are moist.
  • You want to have good socks that wick moisture, Thorlo® once again.
  • When possible wear well ventilated shoes.
  • When you take breaks you want to take your shoes off in order to cool off and dry out your feet. Better yet take your socks off to dry and give your feet a little massage.
  • If you are really prone to blisters you may want to wipe your feet down with a baby wipe in order to clean off any pieces of dirt. These can also cause blisters if they rub on your feet for a period of time.
If you have tried all of that or don't have the money to get new shoes and socks, you can try to reduce blisters by reducing the amount of friction on you trouble areas. One way to do this is Duct Tape. If you know you are going to have trouble on your heel for instance, put Duct Tape right over your heel before you put your sock on. Or if you are feeling a blister starting to happen, you can put Duct Tape on the trouble area to reduce friction.

You don't have to bring a whole roll of tape with you, you can just take a little bit and wrap it around your hiking pole or around something else that you normally carry with you.

If you have any other ideas on how to prevent blisters please post them.

Until next time, hope you enjoyed it.

Wednesday, August 20, 2008

Caves at Red Rock Nevada

Exploring caves is fun.

My friends Ben and Justin where coming to visit for a while and we thought it would be fun find some caves that I heard about in Red Rock. Unfortunately I am not going to say the exact location of the caves because over the years they have received much damage from visitors. There is a lot of trash and spray paint all over the walls and floor. So, in order to preserve what is left of them I don't want to be responsible for sending many other people there.

I will say that if you are planning a trip to Red Rock, their location can be found elsewhere on the Internet and judging by the amount of spray paint on the walls there are quite a few people from Las Vegas that know about them as well. Enough of my rambling though, lets get to the trip.


The trail to the caves

There was a very nice trail that took us most of the way there. The trail is actually where they take people horse back riding around the area.


View Back Toward The Road (almost to the caves)


Closer To The Cave

It was all an easy trail up till about this point. We knew the caves where around that area. But we didn't know exactly where. But, whats the point of exploring if you know where your going. Unfortunately the exploring let us up a cliff. It wasn't anything you need rope to climb, but it wasn't completely safe ether.


Justin Before we climbed


On The Way Up


(Ben, Me, Justin, Natalie) Close To The Entrance of one of the Caves

We finally found both caves. The photos are a mix between both. One of the was basically one large room. While the other drops down several times and had many rooms. It only went back and down though so it was impossible to get lost.


Entrance To Cave


Ben, Me, Natalie Eating Lunch in Cave


Inside cave

Inside cave

Inside cave

Inside cave

Inside cave

Inside cave

Inside cave

Inside cave

Inside cave

Inside cave

Inside cave

Inside cave

Inside cave

Inside cave

Inside cave

Inside cave

Inside cave

Inside cave

Inside cave

Inside cave

Inside cave

Inside cave

Inside cave

Inside cave

Inside cave

Inside cave

One interesting thing we found was that when you hold a black light up to the rocks in the cave, little speckles glow on them.


That image is also a good example of how dark it is in a cave without lights.

You can see what I mean about the spray paint. It really detracts from the cave. We did manage to get all of our cave exploring in before the sun went down.


Right outside the cave

I hope you enjoyed the post and Photos. As always, Comments are welcome. So is subscribing to this blog.


My Ranting Note:

If you do visit a cave or anything in nature I stress once again as I have before, Please take you trash with you. And try your best not to F#!k up the place with a can of spray paint, no matter how much self control you have to exhibit at the time! Thank you.